
Looking for great ideas to update an old fireplace without breaking the bank? This DIY fireplace makeover transformed an outdated fireplace surround into a stunning focal point for our living room—and we did it without spending a fortune! The cost of professional work can be astronomical (our first quote was a shocking ~$7,200, not including materials!), so we found the easiest ways to create a new look on a budget.
A budget-friendly fireplace update can make a big impact without a huge cost. With some clever DIY techniques and a bit of professional help, you can achieve a stunning transformation. Here’s how I turned our outdated fireplace into a cozy, stylish focal point.
Oak and Grain Refinishing is a reader-supported blog. At no extra cost to you, I may receive commission if you click and buy through links on this site. Please review Terms & Conditions.
Out with the Old: Fireplace Update Starts by Removing an Outdated Mantel
Our original fireplace surround featured an outdated mantel and black granite surround. It was classic early 2000’s which no longer fit our design style. We decided to start fresh by demoing these elements. We did this during our kitchen demo while we had the dumpster and easy access to drywall repair professionals.

What is the cheapest way to update a fireplace?””Can I update a fireplace without replacing it?””How do you modernize an outdated fireplace?

Paint Fireplace Box & Exchange Log Set
While we handled the demo ourselves to save money, we enlisted Thomas Fireplace to update the log set. No way we were going to mess around with a gas source. I love a good DIY, but gas hookups are one thing I’m not comfortable messing with.
We upgraded our fireplace log set with the Gnarled Oak (GNO) Log Set from Thomas Fireplace, featuring a burnt-through front log, lively flames, and a large ember bed with Bryte Coals for a realistic and cozy ambiance.
If you’re asking, “Can I paint the inside of my fireplace box?”, the answer is an astounding, “YES!”. In fact, the professionals over at Thomas Fireplace actually suggested painting the fireplace box to better blend with the new log set! This was a very inexpensive, subtle change with big visual impact.
Before the new logs were installed, the professional used a heat resistance paint which he applied to the box itself using a roller. He also used the spray paint version to cover the exposed metal at the front of the fireplace.
While this painting step was definitely something we could have tackled ourselves, it made the most sense for him to handle it. Since the old logs had to be removed first, a DIY approach would have likely turned this into a multi-day project. By having him take care of it, we saved time and wrapped everything up in just one day. The before and after of just the painted box was impressive! If your budget is very limited you could certainly just paint your fireplace box.


What are the benefits of upgrading your log set?
First of all, it’s relatively cost effective compared to an entire new box or vented system install. See how much it updated the box?! To top it off, these modern sets come with a remote starter and adjustable flame settings!
We used to have to get on our hands and knees to light and adjust the fire. Now, with a remote control for the fireplace, it’s easier and more enjoyable than ever.
The total cost for professional updates? Painting box + new log set with remote starter + new bed of embers = $2,435

painting fireplace box black with heat resistant paint // Painting fireplace box black with heat resistant paint before and after // gas fireplace replacement log cost // ventless gas fireplace replacement set // ventless fireplace makeover
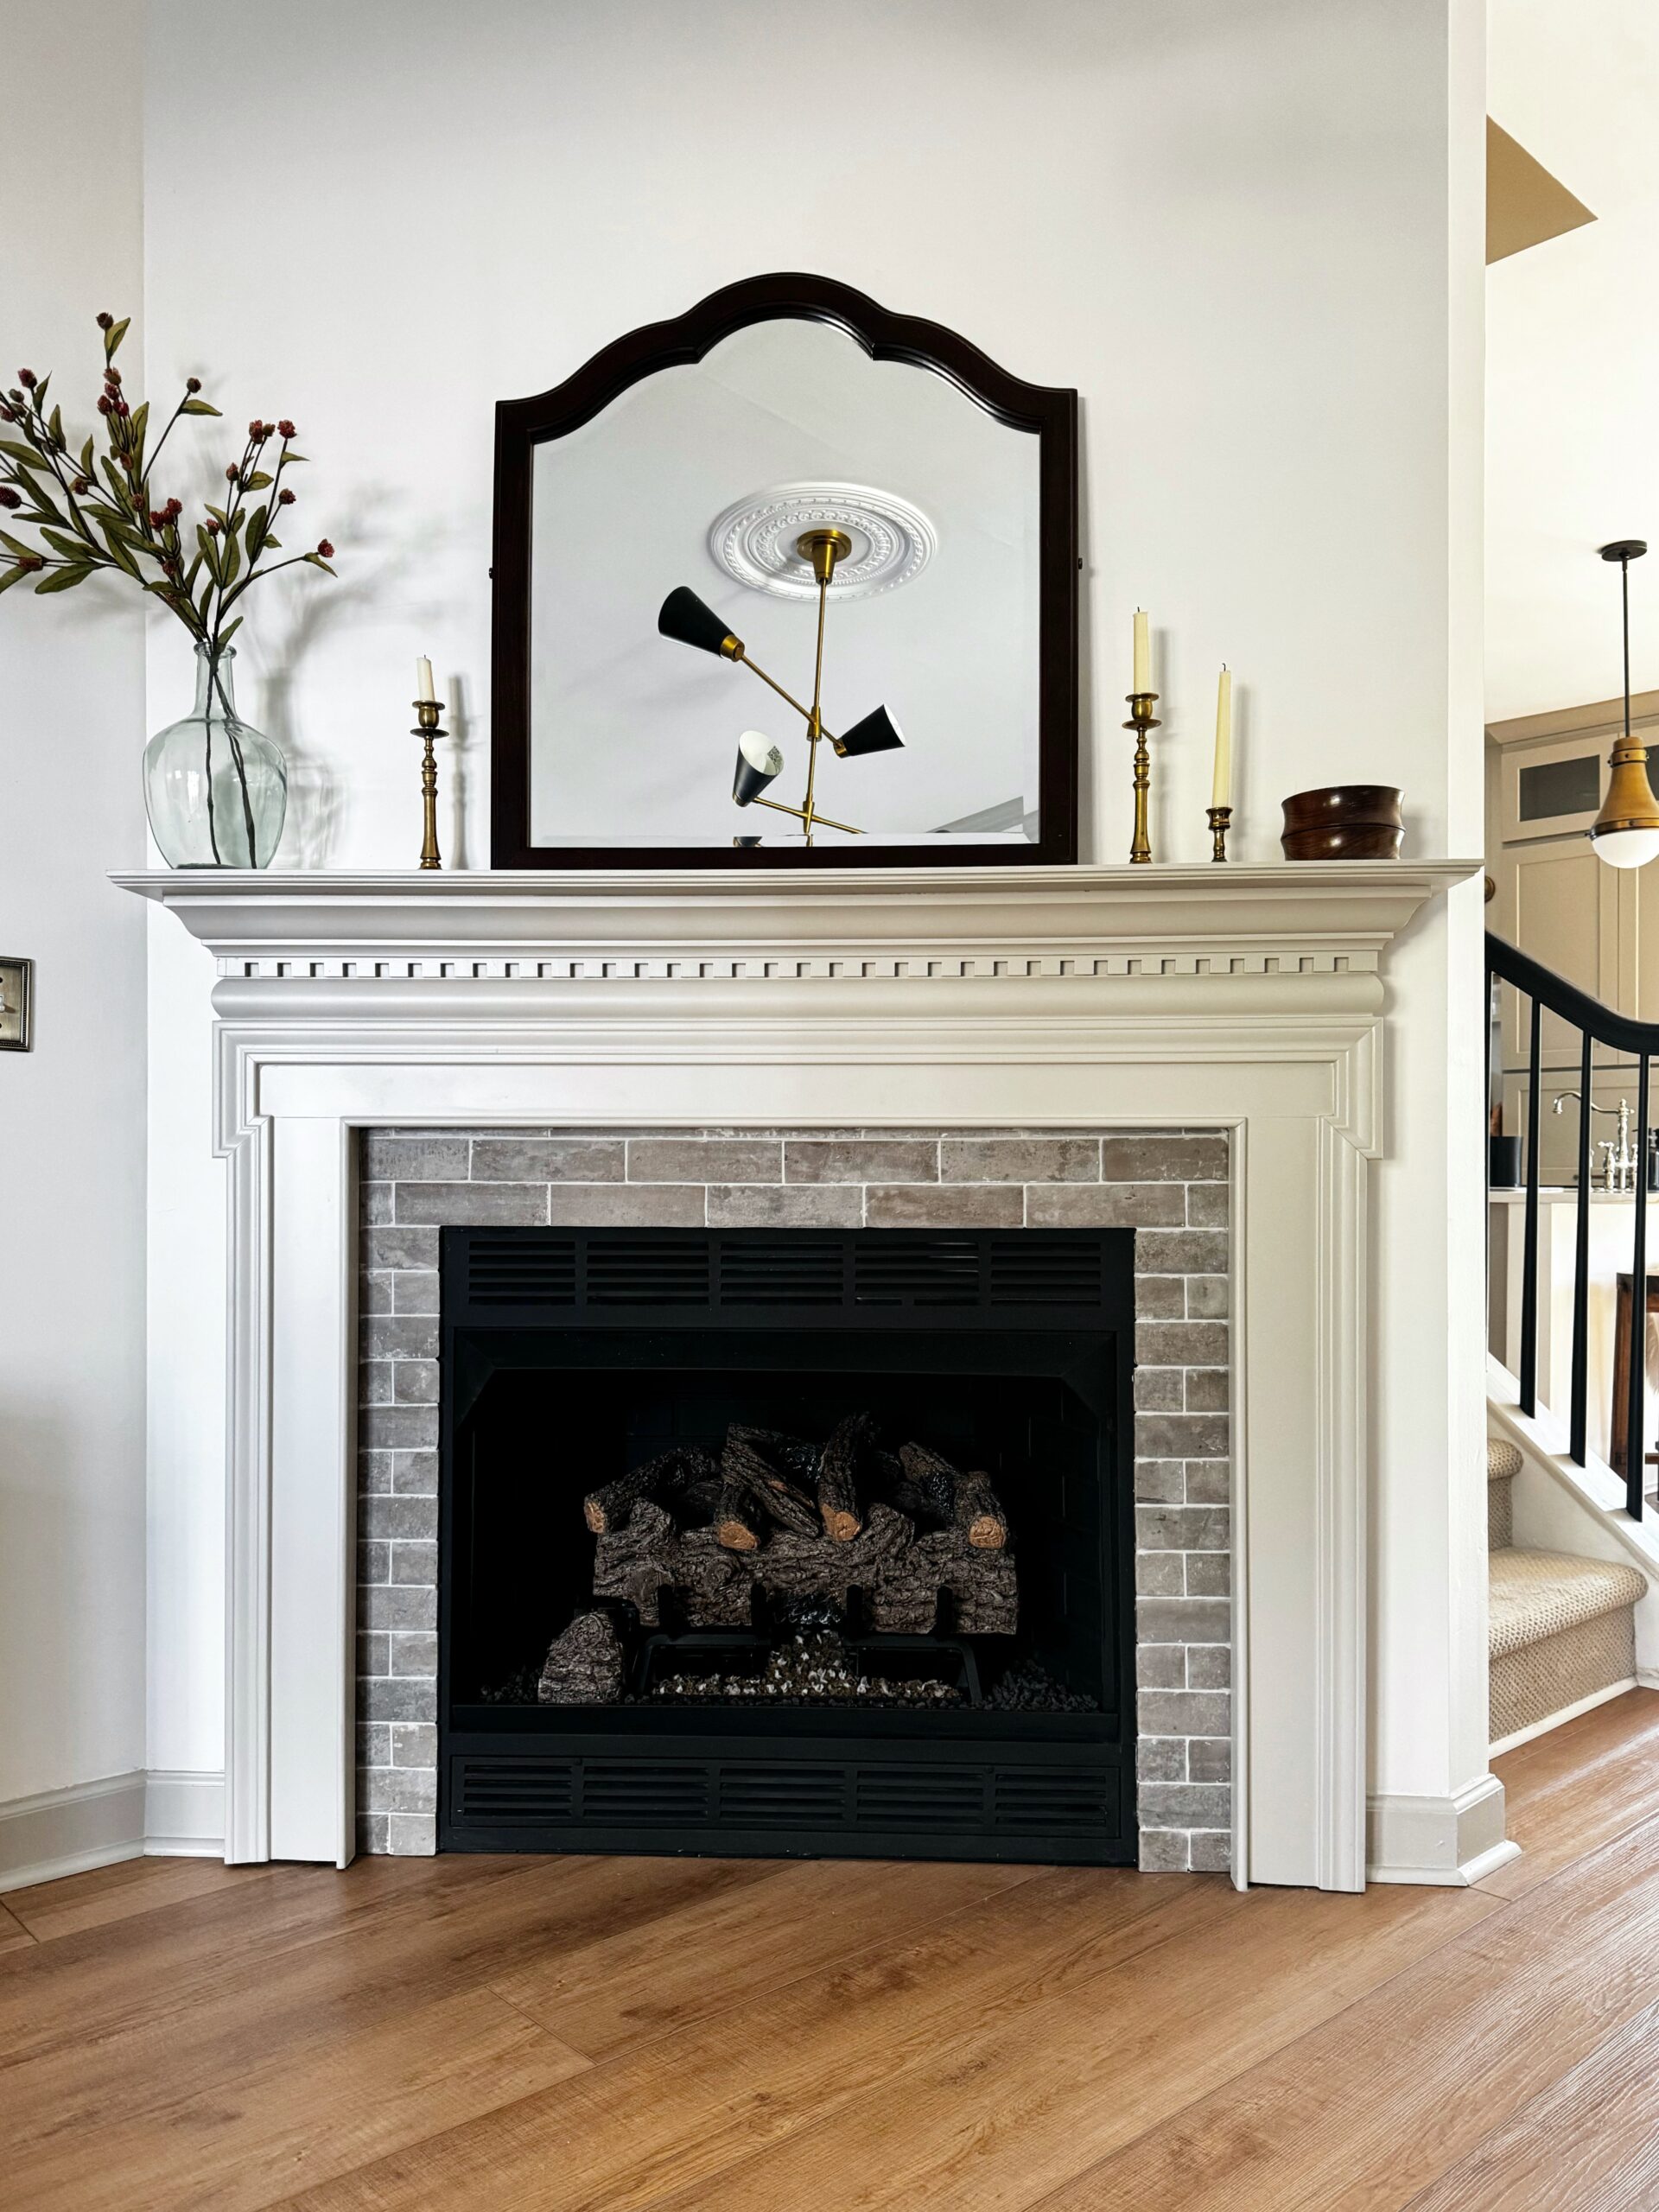
Budget-Friendly Fireplace Update with a Thrifted Mantel
One of my favorite parts of this transformation was giving new life to a thrifted mantel. A new mantel can completely transform an old fireplace. Instead of buying a custom piece, we found a gorgeous, solid wood new mantel on Facebook Marketplace for just $100. To blend seamlessly with our living space, I painted it Sculptor Clay, matching our kitchen cabinets and trim for a cohesive design style. I love how this taupe paint color contrasts our white walls!
This cohesive color choice ties the fireplace into the overall design of our home, making it feel intentional and polished. Paint is always an easy and inexpensive way to update a fireplace! You wouldn’t necessarily have to buy an entire new mantle.

Adding Classic Dimension with Thin Brick Veneer
To give the fireplace a more traditional and timeless look, we opted for thin brick tile, a porcelain product that mimics the texture and charm of real brick. Applying the veneer was a DIY project that my partner, Kevin, and I tackled together using MSI Capella White Brick Matte Porcelain Tile.

how to tile fireplace surround // brick veneer around fireplace // brick tile fireplace surround // traditional fireplace updates // budget friendly fireplace makeover // thrifted mantel fireplace update // taupe painted fireplace mantel // taupe mantel and brick surround fireplace
How to Apply Tile Surround:
Gathering Supplies:
Before diving into tiling around a fireplace, having the right tools and materials on hand will make the process smoother and ensure a professional-looking result. Below is a list of everything you’ll need:
- 1/8-inch spacers
- Tiles or brick veneers
- Trowel
- MAPEI Type 1 Tile Adhesive
- MAPEI Ultracolor Plus FA Grout in Warm Gray
- Level
- Long, thin piece of wood (to use as a brace/level for applying brick to the top of the surround)
- Bucket – for mixing grout
Prepping the Area
Before starting any tiling project, proper prep is key. We laid down resin paper and trash bags to protect the surrounding area from dust, mortar, and potential mess. This step is especially important if you’re working near flooring or furniture you want to keep clean.

Choosing and Cutting the Brick Tile
We opted for thin brick tile, which provides the authentic look of brick without the weight and bulk of full-sized bricks. To make the layout work for our space, we trimmed each brick tile down to 8.5 inches using a wet saw that our neighbor was gracious enough to loan us for the weekend. This adjustment made more sense visually and helped create a balanced design around the fireplace, especially when it came to staggering the sides.

Laying Out the Design
Before adhering any tiles, we did our best to dry-fit the pieces to get a sense of spacing and alignment. This step helped us ensure our originally lay out would, in fact, work!
Applying the Tile Adhesive and Setting the Tile
Using a notched trowel, I spread a layer of thin-set MAPEI Type 1 tile adhesive (which I may refer to as mortar as well) directly onto the back of the tile opposed to the wall itself. This method worked better in the tight space since applying mortar directly to the drywall was tricky. Then I began placing the tiles, pressing firmly to ensure a good bond. We used 1/8th inch spacers which helped maintain consistent gaps for grout.


We opted to start with the top, horizontal layer. Since the brick needed support while the mortar dried, we temporarily attached a small piece of strap wood to act as both a level and brace.


The next morning, after the mortar had time to dry and harden overnight, we removed the brace and got to tiling the vertical sides. I found it easiest to again, apply the mortar directly to the brick and place all the bricks on the wall before applying the spacers.

Grouting Small Spaces by Piping
After allowing the tiles to set and cure, we cleaned them with warm water before applying the grout. The grout float we initially purchased was too large for the narrow spaces. So we improvised, using a ziplock bag with a trimmed corner to pipe the grout directly. After wiping away the excess with a damp sponge, we let everything dry before stepping back to admire the transformation!


Total Cost of Our Fireplace Refresh
- Demo = $0
- Thrifted mantel = $100
- Heat resistant paint = $30
- Remote control log set + embers = $2,405
- Wet saw rental = $0
- Brick-look-a-like tile = $ 35
- Tiling supplies = $132
TOTAL COST = $2,702

Final Touches & Pet-Friendly Considerations
I couldn’t be happier with our fireplace update! I love how the painted fireplace box makes it blend in seamlessly with the new logs and the classic look of the brick tile surround. The fresh coat of paint on the box, the new mantel, and the brick veneer transformed our living room into a warm and inviting space. It was so pretty as is, I only added some simple decor and a thrifted mirror.
Since our fireplace is an open, ventless system, it provides a cozy ambiance without the need for a chimney. While I’m on the hunt for a stylish fireplace screen to complement the new design, our dog, Burkley, seems to instinctively keep his distance from the open flames—making him perhaps the biggest fan of this upgrade! ((A screen would definitely be necessary for a baby & kids)

Shop Fireplace Decor & Accessories


Why a Fireplace Update is Worth It
- Affordability: A mix of DIY and professional help kept costs manageable.
- Thrifted Finds: A new mantel doesn’t have to be expensive—repurposing one saved money and added character.
- Cohesive Design: Painting elements to match our home’s trim created a seamless look.
If you’re wondering how to update your old fireplace on a budget, this DIY fireplace makeover proves that small changes can make a big impact in your living space. The simple, affordable updates have made such a huge difference in how cozy our living room feels! The more modern look has elevated our entire downstairs space.
Fireplace remodel before and after // fireplace makeover ideas // update fireplace surround // diy fireplace makeover // traditional fireplace makeover ideas // budget-friendly fireplace update // modern fireplace upgrades // classic fireplace style // cozy living room updates // how to update an old fireplace // contractors home builders tile & stone // brick fireplace // interior designers fireplace tips // outdated marble tile surround
You May Also Like…
Budget-friendly fireplace update / DIY fireplace makeover / Thrifted mantel ideas / Painted fireplace box / Thin brick firece surround/ Affordable fireplace transformation/ Gnarled Oak Log Set / Traditional fireplace design / Ventless fireplace system / Cozy living room updates / Porcelain brick veneer / Fireplace log set remote control / Modern fireplace upgrades / Classic fireplace style / How to update an old fireplace
Girl Behind the Blog

I’m Jess, the creator of Oak & Grain. A mid-west girl at heart who now resides in Raleigh, NC. I love finding old things and giving them new purpose by way of refinishing or incorporating unexpected, overlooked thrift store finds in the modern home. I work full-time in medicine and I love dipping into my creative side and in the process, keeping my sanity. Follow me on Instagram and YouTube to see more behind the scenes action.